Working with Non-Conformances
Creating a Non-Conformance
- Choose the Search icon, enter Non-Conformances, and select the related link.
- Choose New to create a non-conformance.
- Complete the Non conformance Card:
General Tab
| Field | Description |
|---|---|
| No. | Automatically assigned from the number series configured in Non-Conformance Setup. |
| Description | Enter a brief description of the quality issue. |
| Status | Reflects the current lifecycle stage of the non-conformance. Starts as New when created, progresses to In Progress during investigation and treatment, and is set to Closed once all actions are completed. |
| Document Date | The official date of the non-conformance document. Defaults to the current work date when the record is created. Editable only when Status = New. Use this field to backdate the record when the issue was detected before the entry was created — for example, when a customer complaint is received by mail several days after the event. This date is used as the base for calculating the Estimated Closure Date. |
| Evaluation | The assessment result of the non-conformance (e.g., Justified, Not Justified, Pending Investigation). |
| Comments | Indicates whether internal comments have been recorded on this non-conformance. |
| External Non-Conformance No. | An optional reference to a complaint number or quality document issued by an external party (e.g., a customer’s own quality reference). |
Document Tab
| Field | Description |
|---|---|
| Source | Identifies how the non-conformance was detected (e.g., Customer Complaint, Audit, Production Inspection). Select from the source codes configured in Non-Conformance Setup. |
| Category | Classifies the type of quality issue (e.g., Packaging, Labeling, Allergen). Select from the categories configured in Non-Conformance Setup. |
| Sub-Category | A more specific classification within the selected Category (e.g., Undeclared Allergen under Allergen). When Category is changed, Sub-Category is automatically cleared. |
| Severity | Indicates the impact level of the non-conformance (e.g., Critical, Major, Minor). Select from the severity codes configured in Non-Conformance Setup. |
| Estimated Closure Date | The target date by which the non-conformance should be resolved. Calculated automatically as: Document Date + Default Treatment Duration (configured in Non-Conformance Setup). Editable only when Status = New, allowing a manual override when needed. If the Document Date is modified, the Estimated Closure Date is recalculated automatically. |
| Real Closure Date | The date when the non-conformance was actually closed (Status set to Closed). Set automatically by the system when the status is changed and cannot be edited manually. |
| Reference Non-Conformance No. | Links this record to a related non-conformance. Used to track connected quality issues — for example, a customer complaint that leads to a separate supplier investigation. |
Source Tab
| Field | Description |
|---|---|
| Source Type | Defines the party involved in the non-conformance. Select Customer, Vendor, Internal, or Transport. Changing this field will prompt deletion of existing non-conformance lines if any exist. |
| Source No. | The specific customer, vendor, or shipping agent associated with this non-conformance. Not applicable when Source Type = Internal. |
| Currency Code | The currency used for financial tracking on this non-conformance. Automatically populated when Source No. is selected, or set manually. Applicable for Customer and Vendor types only. |
| Contact No. | An optional contact person linked to the Source No. (customer or vendor contact). When selected, the Contact Name and Source E-mail Address are populated automatically. |
| Contact Name | The name of the selected contact. Populated automatically when Contact No. is filled in. |
| Source E-mail Address | The e-mail address used for communication regarding this non-conformance. Populated automatically from the contact or source record, and can be edited manually when Source Type = Internal. |
Analysis Tab
The Analysis section is used to record the root cause of the non-conformance, following the investigation phase. These fields support quality analysis, Pareto reporting, and continuous improvement activities.
| Field | Description |
|---|---|
| Reason Code | Identifies the root cause category of the non-conformance (e.g., Process Deviation, Supplier Issue, Human Error). Selected from the Reason Codes configured in Non-Conformance Setup. When this field is changed, the Sub Reason Code is automatically cleared. |
| Sub Reason Code | Provides a more precise root cause within the selected Reason Code category (e.g., Temperature control failure under Process Deviation). Only sub reasons linked to the selected Reason Code are available for selection. |
Important distinction between Source and Reason:
- Source (in the Document section) describes where or how the non-conformance was detected — for example, a customer complaint, an internal audit, or a supplier delivery inspection.
- Reason Code / Sub Reason Code (in the Analysis section) describes why the non-conformance occurred — the actual root cause identified during investigation.
Both fields serve different analytical purposes. Source supports detection-point analysis, while Reason and Sub Reason support root cause analysis and Pareto charts.
Use in Reporting and Power BI
The Reason Code and Sub Reason Code fields are available in the Non-Conformance API (v1.0)
as reasonCode and subReasonCode. This allows quality teams to:
- Filter and sort non-conformances by root cause in Power BI dashboards.
- Build Pareto charts by Reason Code frequency.
- Track recurring root causes over time for continuous improvement.
Example Scenario — Root Cause Analysis
Sophie, a Quality Manager at a Food & Beverage company, receives a customer complaint about an allergen labeling error. She creates a non-conformance with:
- Source:
CUSTOMER(the issue was detected via a customer complaint) - Reason Code:
PROC-DEV(Process Deviation) - Sub Reason Code:
CROSS-CONT(Cross-contamination)
At the end of the month, she exports data to Power BI and generates a Pareto chart showing
that 65% of non-conformances share the root cause PROC-DEV, enabling her to prioritize
corrective actions on process controls.
Adding Non-Conformance Lines
For Customer or Vendor Non-Conformances:
- In the Lines section, select the Source Document Type (Posted Sales Shipment, Posted Sales Invoice, Posted Purchase Receipt, or Posted Purchase Invoice).
- Use the lookup on Source Document No. to select the document.
- Select the Source Document Line No. to link to a specific line.
- The system automatically populates:
- Item No., Variant Code, Unit of Measure
- Source Quantity and Unit Price
- Enter the Non-Conformance Quantity (the affected quantity).
- Adjust Non-Conformance Unit Price if different from the source.
- Optionally select Serial No., Lot No., or Package No. from the item tracking.
- Add a Line Description and Comments for Non-Conformance Report.
For Internal Non-Conformances:
- Manually enter the Item No. and related fields.
- Use lookups to select tracking numbers from existing lot or serial information.
Using Extract Document Lines:
- Choose Extract Document Lines from the action bar.
- Select the documents and lines you want to add.
- The lines are automatically created in the non-conformance.
Creating an Action Plan
- From the Non-Conformance Card, choose Create and Assign Action Plan.
- Select an Action Plan Template or create actions manually.
- The Action Plan is created and linked to the non-conformance.
- Navigate to the Action Plan Card to:
- Review and modify actions
- Set due dates
- Mark lines as completed when actions are done
Creating Follow-up Documents
To Create a Return Order:
- From the Non-Conformance Card, choose Create Return Order.
- The system creates a Sales Return Order (for Customer types) or Purchase Return Order (for Vendor types).
- The return order is linked to the non-conformance and visible in the Related Documents factbox.
To Create a Credit Memo:
- From the Non-Conformance Card, choose Create Credit Memo.
- The system creates a Sales Credit Memo or Purchase Credit Memo with an Item Charge line based on the Sub-Category setup.
- The credit memo is linked to the non-conformance.
Printing and Sending Non-Conformances
- Choose Print Non-Conformance to generate a report.
- Choose Send by E-mail to email the non-conformance report to the source contact.
Closing a Non-Conformance
- Ensure all Action Plans are completed.
- Ensure all related documents (return orders, credit memos) are processed.
- Optionally set an Evaluation code.
- Change the Status to “Closed”.
- The Real Closure Date is automatically set.
Note: A non-conformance cannot be closed if there are open action plans or unprocessed related documents. Once closed, a non-conformance cannot be reopened.
Example Scenarios
Scenario 1: Customer Complaint About Damaged Cheese
A customer calls to report that a shipment of artisanal cheese arrived with damaged packaging and visible mold on several wheels.
-
Create a new Non-Conformance with:
- Source Type: Customer
- Source No.: Select the customer
- Category: QUALITY
- Sub-Category: PRODUCT-DAMAGE
- Severity: MAJOR
-
Use Extract Document Lines to pull in lines from the Posted Sales Shipment.
-
For each affected lot:
- Enter the Non-Conformance Quantity
- Select the Lot No. from item tracking
- Add comments describing the damage
-
Choose Create and Assign Action Plan to initiate corrective actions:
- Investigation by Quality team
- Root cause analysis by Production
- Customer communication by Sales
-
Create a Sales Return Order for the customer to return the damaged goods.
-
Once the return is received and investigated, create a Sales Credit Memo if warranted.
-
Complete all action plan tasks and close the non-conformance with Evaluation: JUSTIFIED.
Scenario 2: Vendor Supplies Non-Compliant Raw Materials
Incoming inspection identifies that a batch of flour from a vendor has allergen cross-contamination (undeclared peanut traces).
-
Create a Non-Conformance:
- Source Type: Vendor
- Source No.: Select the vendor
- Category: ALLERGEN
- Sub-Category: CROSS-CONTAMINATION
- Severity: CRITICAL
-
Link to the Posted Purchase Receipt.
-
Select the affected lots and enter the full quantity as non-conforming.
-
Create a Purchase Return Order to return the entire batch.
-
Assign an Action Plan including:
- Vendor audit request
- Review of supplier qualification
- Update to receiving inspection procedures
-
Document the resolution and close with appropriate evaluation.
Scenario 3: Internal Quality Issue in Bottling Line
Production discovers that a batch of wine bottles has incorrect labels applied.
-
Create an Internal Non-Conformance:
- Source Type: Internal
- Category: LABELING
- Sub-Category: WRONG-LABEL
- Severity: MAJOR
-
Manually enter the affected item and lot numbers.
-
Create an Action Plan with tasks for:
- Production to quarantine affected bottles
- Quality to assess scope
- Operations to relabel or dispose
-
Track corrective actions to completion.
Non-Conformance Factbox
The Non‑Conformance FactBox provides users with a quick, contextual overview of all relevant links associated with a Non‑Conformance record. It gives immediate visibility into:
- Action Plans created for follow‑up
- Related Non‑Conformances connected through cross‑reference
- Documents generated from the Non‑Conformance (such as Return Orders and Credit Memos)
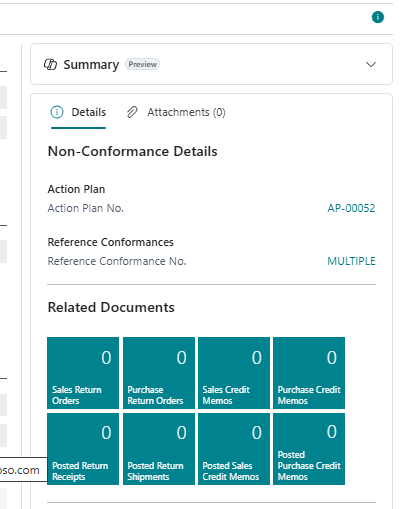
FactBox Elements
Action Plan No.
- Displays the Action Plan linked to the Non‑Conformance.
- Clickable field that opens the Action Plan Card.
Reference Non‑Conformance
- Clickable link that opens the referenced record.
Example scenario:
- If the user opens NC001, the FactBox displays all records where:
- Reference Non‑Conformance No. = NC001
This enables quick navigation between related issues, such as:
- A customer claim linked to a vendor claim
- Multiple internal reports relating to the same deviation
Related Documents Cue
A dedicated cue displays all documents created from the Non‑Conformance, offering full traceability from detection to financial or logistical resolution.
Return Orders
If a Return Order is created from the Non‑Conformance:
- The corresponding Return Order No. is displayed.
Posted Return Documents
When the Return Order is posted, the FactBox displays the results according to the posting method:
| Posting Method | Factbox Displays |
|---|---|
| Ship or Receive only | Posted Return Shipment / Posted Return Receipt |
| Ship & Invoice or Receive & Invoice | Posted Return Shipment or Return Receipt and the related Posted Sales Credit Memo or Posted Purchase Credit Memo |
This mirrors real operational flows and gives users instant visibility of all financial and logistical documents resulting from the NC resolution.
Troubleshooting
Cannot Close Non-Conformance
Symptom: The system displays an error when trying to set Status to Closed.
Resolution:
- Verify all Action Plan lines are marked as completed
- Check the Related Documents factbox for open return orders or credit memos
- Process all pending documents before closing
Cannot Select Transport as Source Type
Symptom: Selecting “Transport” for Source Type shows an error.
Resolution: The Transport type requires the Bricklead Transport Management app to be installed. Contact your administrator to install the app or use a different source type.
Non-Conformance Quantity Exceeds Source Quantity
Symptom: Error when entering Non-Conformance Quantity.
Resolution: The non-conformance quantity cannot exceed the original document line quantity. If tracking multiple issues for the same line, create separate non-conformance lines.
Cannot Find Posted Document in Lookup
Symptom: The expected posted document doesn’t appear in the lookup.
Resolution:
- Verify the correct Source Type is selected (Customer vs. Vendor)
- Ensure the Source No. matches the customer/vendor on the document
- Check that the document type is correct (e.g., Posted Sales Shipment for Customer)
Action Plan Template Not Available
Symptom: The Sub-Category is set but no template is suggested.
Resolution:
- Open the Non-Conformance Sub-Categories page
- Verify the Action Plan Template Code is set for the sub-category
- Ensure the template type matches the non-conformance source type
Frequently Asked Questions (FAQ)
Q: Can I delete a closed Non-Conformance?
A: No. Closed non-conformances cannot be deleted to maintain audit trail integrity. This is essential for regulatory compliance.
Q: How do I track which lots are affected by a non-conformance?
A: On the Non-Conformance lines, use the Lot No., Serial No., or Package No. fields. You can also view non-conformances from the Lot No. Information Card using the Navigate action.
Q: Can multiple action plans be linked to one non-conformance?
A: No. Each non-conformance can have one action plan. If additional corrective actions are needed, add more lines to the existing action plan.
Q: How is the Estimated Closure Date calculated?
A: It’s calculated by adding the Default Treatment Duration (from setup) to the creation date, accounting for working days based on the company’s base calendar.
Q: Can I reopen a closed non-conformance?
A: No. Once closed, a non-conformance cannot be reopened. If a related issue occurs, create a new non-conformance and use the Reference Non-Conformance No. field to link them.
Q: How do I handle recurring issues from the same vendor?
A: Create separate non-conformances for each occurrence. Use the Reference Non-Conformance No. to link related cases. Analyze patterns using list views filtered by Source No.